


Help Center
Quark XPress Help
- Adobe Photoshop Help
- Adobe Illustrator Help
- Adobe InDesign Help
- Adobe Acrobat Help
- Quark XPress Help
Step 1: Create a New Document
After launching your Quark Xpress application, Choose File > New > Project... (See Figure 1) Keyboard Shortcut: Ctrl+N for PC users, Cmd+N for Mac users

Figure 1
When the New Project window appears, (See Figure 2)
- Enter a name for your project.
- Set the Layout Type to Print.
- Set the Width & Height of your artwork to the final size of the product you are creating.
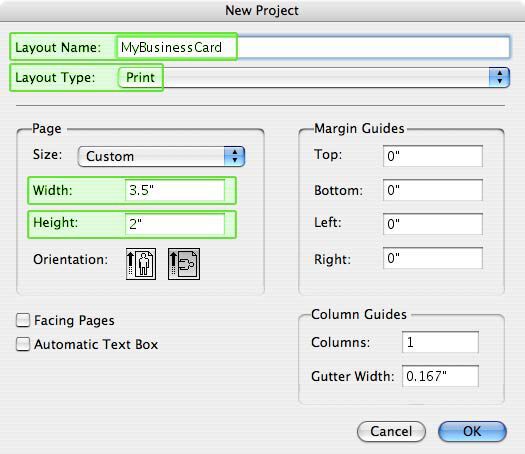
Figure 2
Step 2: Exporting your Files
When you have completed your design, and checked it against the guidelines above,
- Choose File > Export > Layout as PDF... (See Figure 3)

Figure 3
When the Export to PDF window appears, choose a name and location to save your PDF, then click the Options... button. (See Figure 4)

Figure 4
In the PDF Export Options window, navigate to the Job Options tab. (See Figure 5)
- Under Compression Options, select None and Keep Resolution for all three image types.
- Check the Compress Text and Line Art and ASCII Format checkboxes.

Figure 5
Next, navigate to the Output tab. (See Figure 6)
- Under Color Output options, select Type: Composite and Print Colors: CMYK.
- From the Registration dropdown select Centered and set Offset to 6pt.
- Under the Bleed options, set Type to Symmetrical and set Amount to 0.125"

Figure 6
Lastly, navigate to the OPI tab. (See Figure 7)
- Uncheck the OPI Active checkbox.
- When you've confirmed all the above settings, click the OK button to return to the PDF Export window.
- From the PDF export window, click the Save button and your PDF will then be saved.

Figure 7
We recommend you open your PDF and check that it was created correctly before submitting to PrintRunner.